Friday, July 30, 2010

Grilling Part 2 - Hobo Supper


Here's the recipe I was given some time ago & suggested that Larry cook some time while he's on the road...

1 pound ground beef
5 potatoes, peeled and cut into steak fries
4 large carrots, peeled and sliced lengthwise
1 onion, peeled and sliced into rings
salt to taste
ground black pepper to taste
garlic salt to taste

Preheat grill.

Shape the ground beef into patties, make a little well in the middle and place on aluminum foil. Layer the vegetables on top , starting with the potatoes, then carrots and finally onion rings. Season with salt, pepper and garlic salt to taste.
Cover with aluminum foil and seal edges. Bake on grill for 1 hour, or to desired doneness.


You can add seasoning salt, beef broth or even Worcestershire sauce for additional flavor. In the picture above, Larry took a short-cut and bought the little can of corn & carrots then diced the potatoes so that it wouldn't take near as long to cook. He said it was awesome!


Grilling Part 1 - Chocolate Banana Boats

Some know, others may not but Larry travels quite a bit. His travelling slowed down at one point but lately it's picked up again. When he's on the road, he typically eats out every meal but when he's home he wants me to cook. Eating out = burn out so he purchased him a little gas grill the other day and has been cooking out...on the tailgate of his truck...in the motel parking lot! (Yes, he stays in motels!)

He was so proud of his grill that he just had to cook on it for me. Well, I hated to tell him but it didn't do anything for me. The steak was tough and dry. So he bought a "grilling" magazine and read all kinds of stuff online and after several attempts...he finally did it! I thought he did an awesome job on this T-bone! Matter of fact, I cut it with my fork!!! It was so good and I was so proud of him! He told me one night, I want to cook you something that's worthy of being posted on your food blog! I couldn't help but LAUGH OUT LOUD!!! He doesn't even read my blog but he knows it's something I enjoy!

Anyway, he had to go back to MS this week and already has fired up the grill. Here's what he's grilled so far...ENJOY!

Chocolate Banana Boats
2 -4 ripe bananas
Hershey Bar (or semi sweet chocolate chips - about 2 oz)
2 ounces miniature marshmallows, optional
Whipped cream or ice cream, optional

Preheat barbecue Grill.
Using a sharp knife, make a slit along most of the length of the unpeeled banana skin and almost through the bananas.
Push chocolate chips and marshmallows (if using) into the slits; push the banana skins closed.
Wrap each banana tightly in aluminum foil. (He didn't wrap them in aluminum foil!)
Place the banana packets on the grill rack and cook for 10 minutes, turning the packets after 5 minutes. Remove from the grill.
Carefully open the banana packets (if wrapped in aluminum foil) and remove the cooked bananas from the aluminum foil.NOTE: You can serve in the aluminum foil.
If desired, serve with either whipped cream or ice cream. Serve with a teaspoon, to scoop out the cooked banana flesh covered in melted chocolate.
Make 4 servings.

Friday, July 23, 2010

Cake Balls- Updated

After posting on my other blog about making cake balls & receiving requests for the recipe, I decided to go ahead with the post. So, here they are.

Now I love http://www.bakerella.com/ - she's a FANCY cake ball making gal! Mine are not so fancy but OH SO DELISH!!

You will need 3 things for cake balls: cake, frosting & coating. Here are some ideas:
- Devil's food cake with fudge icing & dark-chocolate coating
- Yellow cake mix with buttercream frosting & orange-flavored vanilla coating with green & black accents
- White cake with white frosting mixed with orange & yellow sprinkles and chocolate coating
- German chocolate cake with coconut-pecan icing and milk-chocolate or light cocoa flavored coating
- Spice or carrot cake with cream cheese frosting and vanilla coating
- Lemon cake with lemon frosting and vanilla coating
- Chocolate cake with vanilla frosting and mint flavored coating tinted green.
- Strawberry cake with strawberry frosting and chocolate coating
- Carrot cake balls with cream cheese frosting and chocoate coating
- Red Velvet cake balls with cream cheese icing and vanilla coating
- White Pillsbury Funfetti cake mix with white frosting & vanilla coating. Decorate with sprinkles, etc...
Thought about this after I posted - take a bag of Oreos, crumble them up, add a block of cream cheese and mix well. Roll into balls, freeze them & then dip them into vanilla coating! OH YUMMY!!

Basic cake balls
1 (18.25 oz) boxed cake mix plus ingredients called for on box
1 (16 oz) can prepared frosting
Almond Bark Coating or Confectionery Wafer Coating

Bake the cake according to package instructions. While warm, crumble the cake into a bowl with a hand mixer to a fine texture. Mix in frosting to make a paste, using 3/4 to a full can of frosting, according to taste. Chill the mixture for at least 2 hours.

Using a melon baller or your hands, form the mixture into 1 1/2 inch balls. Place on wax paper; freee for at least 6 hours. (Below is what you'll get...)


Working in small batches, remove balls from the freezer & dip them into warm, melted Almond Bark Coating or Confectionery Wafer Coating, using toothpicks or forks to manipulate the balls. Remove balls & place on wax paper to harden.

Makes about 30 cake balls.

Almond Bark Coating: In a double boiler, melt one (20-oz) package vanilla or chocolate flavored almond bark, stirring constantly. Or, in a tall, narrow container, microwave almond bark for 45 seconds on High (100% power). Continue to heat in 15 second intervals, stirring between intervals, until melted. Be careful not to scorch.

When almond bark is melted, stir in 1 tsp vegetable oil. If desired, stir in oil-based coloring drop by drop until you achieve the desired color.

Confectionery Wafter Coating: Melt 48 oz confectionery wafers in a double boiler or microwave oven per instructions for Almond Bark Coating. Omit oil. If desired, stir in oil-based coloring drop by drop until you achieve the desired color.

Cream Cheese Frosting: Cream 8 oz cream cheese & 4 Tbsp softened butter with an electric mixer at medium speed until fluffy and smooth. Add 1 Tbsp vanilla extract & 1 c powdered sugar; beat at high until creamy.

Cake Ball Tips
Chill the cake & frosting mixture well - at least 2 hours before you shape into balls. Freeze at least 6 hours before dipping. However, before dipping, make sure cake balls aren't frozen solid because after being dipped, the coating has a tendency to crack when drying. Pre-dipped cake balls can be kept frozen for weeks.

To form ball, use a melon scoop for uniform size. Small balls are easier to eat!!!

For decoration, fill a narrow-tip plastic squeeze bottle with contrasting color of melted coating & paint stripes over the balls or sprinkel on rainbow sprinkles, sparkling sugar or chopped nuts.


Use your imagination and have fun! These are SO good!


Tuesday, July 20, 2010

Blackberry Cobbler

I know the recipe & the picture do not match. What you're looking at is a Blackberry Pie rather than a cobbler but I'm going to list the recipe I have for a Blackberry Cobbler! (Hope that made sense!) You see, I got some fresh blackberries the other day at work, came home, whipped this "pie" up and realized after it was done ..... I was supposed to make a cobbler! Oh I hate when that happens. I will say that I followed the instructions pretty much for the cobbler except that I put a pie crust on top instead of the one listed below. AND.....there weren't any complaints - it was pretty much all gone by 9:00!

Ingredients
3/4 c sugar
2 c plus 1 Tbsp self rising flour
12 oz fresh (or frozen) blackberries ...about 3 cups
4 Tbsp butter, cut into small pieces & chilled
2/3 c milk
Vanilla Ice Cream - for serving

Directions
Preheat oven to 450. Grease an 8 in square baking dish. In a medium saucepan, combine the sugar, 1 Tbsp flour, berries & 1 c water. Bring to a boil, lower heat & simmer 2 minutes then remove from heat. (I added a shake or two of poppyseeds to mine & a little dab of nutmeg!)

In a medium bowl, rub the butter into the remaining 2 c flour. Stir in the milk until a soft dough forms. Turn out the dough on a lightly floured surface. Pat into a square then roll into an 8-inch sqare, cute into 6 long strips.

Pour 1 c of the berry mixture into pan. Arrange 3 dough strips an equal distance apart over the blackberry mix. Bake until golden brown - about 12 minutes - remove from oven & pour the remaining berry mixture over the baked strips. Arrange another layer of dough strips perpendicular to the first row & bake until golden brown - about 12 minutes more. Let cool for about 20 minutes. Serve warm with vanilla ice cream.

If you use frozen blackberries, add 1 Tbsp fresh lemon juice to the fimmered filling.

Now, go get a toothpick so you can get all those seeds out of your teeth! (HA!)

Monday, July 5, 2010

Blueberry & Pear Pie

A group of ladies at work purchased some fresh blueberries and one made a comment to me about taking them and making her a pie. So, I brought them home and did just that.

I made a crust and then followed the below to assemble the pie.

Filling:
6 cups of fresh (or frozen) blueberries, rinsed and stems removed (if using frozen, defrost and drain first)
1/2 teaspoon lemon zest
1 Tbsp lemon juice
1/4 cup all-purpose flour (for thickening)
1/2 cup white granulated sugar
1/4 teaspoon cinnamon
2 Tbsp butter (unsalted), cut into small pieces
Egg wash:
1 egg
1 tablespoon milk
Roll dough out & fit it over a 9-inch pie pan, and trim the edges to a 1/2 inch over the edge all around the pan. Put into the refrigerator to chill for about 30 minutes.
Gently mix the blueberries, sugar, flour, cinnamon, lemon zest, and lemon juice in a large bowl. Transfer them to the chilled bottom crust of the pie pan. Dot with butter pieces. Roll out remaining dough to the same size and thickness as the first. Place on top of the berry filling. (As you can see from the picture, I cut the dough into little flowers & placed on top!) Tuck the top dough over and under the edge of the bottom dough, and crimp the edges with your fingers. Transfer the pie to the refrigerator to chill until the dough is firm, about 30 minutes. Heat oven to 425°F.
Whisk egg and milk together to make an egg wash.
Remove the unbaked pie from refrigerator. Brush the top with egg wash. Score the pie on the top with 4 cuts (so steam can escape while cooking). Place the pie on the middle rack of the oven with a parchment paper or Silpat lined baking pan positioned on the lower rack to catch any filling that may bubble over.

Bake for 20 minutes at 425°. Reduce heat to 350°F and bake for 30 to 40 minutes more or until juices are bubbling and have thickened.

Transfer to a wire rack to cool. Let cool completely before serving.
Makes 8 servings.


The reason the title is Blueberry & Pear Pie is because I didn't have enough blueberries so I added equal amounts of Pears. There were several who made it clear they did not like pears but loved the pie! I think the pears pulled the tanginess out of the blueberries and the blueberries added flavor to the pears! Super combination!!

Saturday, July 3, 2010

Possum Cream Pie

Also known as....4 Layer Delight! At this same little restaurant we ate at last week, they served up Possum Cream Pie! One look at it and I knew it was what we always called 4 layer delight and I've made it tons of times.
I decided since I was making the Pig Picken' Cake (see below) that I'd make this as well to take to work and share with my co-workers. One other time when I made this, I used coconut pudding so it was like a coconut cream pie! I think you can make it any flavor and it'd be just as good!

Ingredients...
c. flour
1 stick butter
1 lg. container Cool Whip
1 1/2 c. powdered sugar
1 1/2 c. chopped pecans
2 tsp. vanilla
Grated chocolate
1 lg. pkg. instant vanilla pudding
1 lg. pkg. instant chocolate pudding
1 (8 oz.) cream cheese

CRUST: Mix flour, 1 cup chopped pecans and butter. Press in bottom of an 8x13 inch pan. Bake at 325 degrees for 20 to 25 minutes. Cool crust completely.

Layer 1: Mix cream cheese, 1/2 cup Cool Whip and 1 cup powdered sugar. Spread evenly over crust.
Layer 2 & 3: Mix puddings separately according to directions using a little less milk so pudding will set thicker. Add 2 teaspoons vanilla to vanilla pudding. Add 1/4 cup powdered sugar to each pudding. Gently spread each bowl of pudding over cream cheese filling.
Layer 4: Spread remaining Cool Whip over pudding. Sprinkle 1/2 cup pecans and grated chocolate on top.
Refrigerate long enough for pudding to set.


Pig Picken' Cake

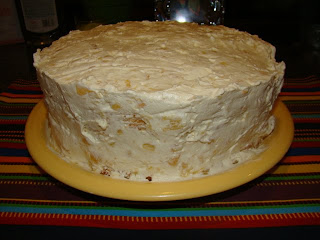
Last week, a co-worker and I ate at a local restaurant we'd heard good reviews on. It was a little out of our way but the food was good. They serve Fried Green Tomatoes and that was the reason I was going!!! We'd heard about this Pig Picken' Cake so of course, we had to give it a try. One bite and I knew I could duplicate it! So, after work, I went by the store and came home to put together my version.
It goes a little something like this...

1 box yellow cake mix
1 (11 oz) can mandarin oranges
4 eggs
1/2 c oil

Mix cake mix, oranges (with juice), eggs & oil with an electric mixer until oranges are "blended" and better is fluffy. Divide evenly into 3 round cake pans & bake at 350 degrees for 20-25 mins. Cool.

Icing...
1 (20 oz) can crushed pineapple
1 (8 or 9 oz) container of Cool Whip
1 pkg instant vanilla pudding mix

Blend pineapple (with juice), Cool Whip & dry pudding mix until well blended. When cake is cooled, ice between layers, sides & top of cake. Keep cake refrigerated.

After I made this, I thought it sure would be good to sprinkle coconut & pecans on top & maybe even decorate with mandarin oranges!

Enjoy!